Pebble Plugin Creation
On the search for a java blog I stumbled over pebble. It has everything I need and is quite easy to install and to customize.
I just started so everything that come now is to be seen with some caution
post is valid for:
| plugin | version | git-hash |
|---|---|---|
| pebble | 2.6.6 | 9bc1c98d15e5f09f51a00611c3cbc51084d26907 |
First of all get the the sourcecode from github:
git clone https://github.com/pebbleblog/pebbleTo check if the system is setup ok, create the package via maven:
# go in the git-repository
cd pebble
# create the package and write an eclipse project
mvn package eclipse:eclipse
If everything went well you can now import pebble as eclipse-project.
In eclipse:
- right-click project
- configure => convert to maven... (something like that)
- right-click project
- Run as=>Run on Server
This assumes you already created a server in eclipse
Tomcat should be running now, listening on http://localhost:8080/pebble
You can login with the user credentials(username/password). On my version the login-process was a bit buggy using the login-sidebar-widget but worked on the login page
Now you can also call the help page which let you access some valuable information: 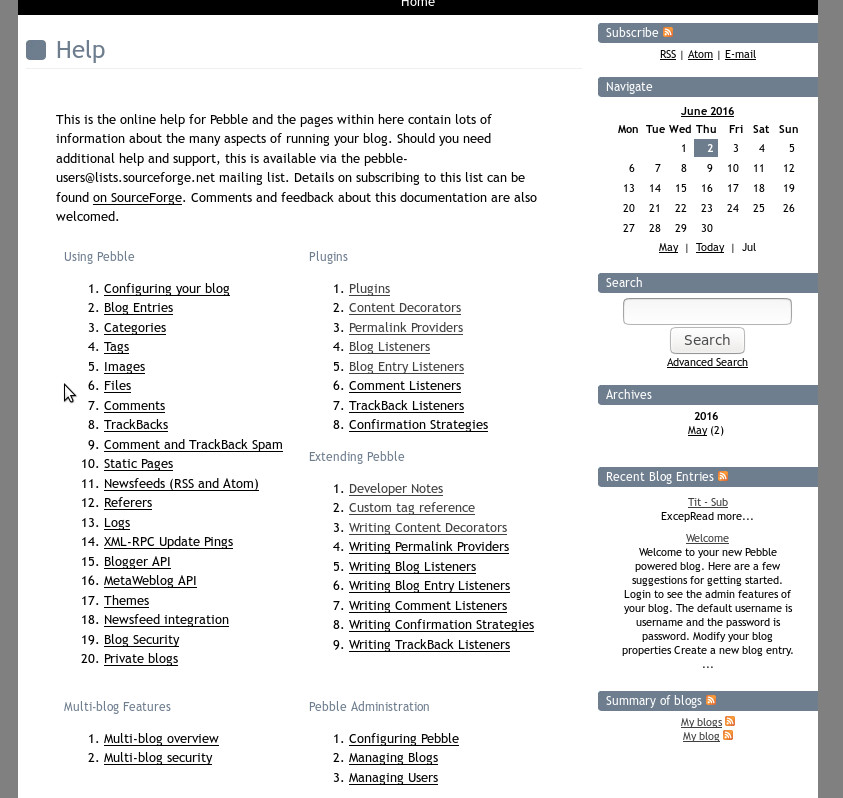
I don't want to dive too deep into it and will now start with the minimal plugin.
Create a File 'AddText' in net.sourceforge.pebble.decorator
package net.sourceforge.pebble.decorator;
import net.sourceforge.pebble.api.decorator.ContentDecoratorContext;
import net.sourceforge.pebble.domain.BlogEntry;
/**
* Adds text to earch Blog-Post. Specify the text via plugin-config
*
* @author Thomas Trocha
*/
public class AddText extends ContentDecoratorSupport {
private static final String KEY_CONFIG_TEXT = "importblog.url";
/**
* Decorates the specified blog entry.
*
* @param context
* the context in which the decoration is running
* @param blogEntry
* the blog entry to be decorated
*/
public void decorate(ContentDecoratorContext context, BlogEntry blogEntry) {
// read the current blog-entry's html
String body = blogEntry.getBody();
// read the config-data from the blog-configuration
String text = blogEntry.getBlog().getPluginProperties().getProperty(KEY_CONFIG_TEXT);
if (text == null || text.length()==0) {
text = "No Text specified!";
}
// change the blogEntry-content with our new text
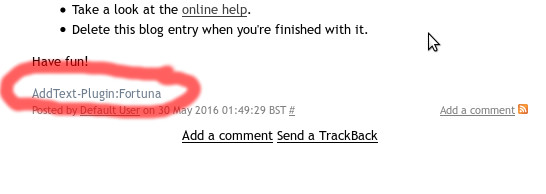
blogEntry.setBody(body + "<h3>AddText-Plugin:"+text+"</h3>");
}
}This is a simple plugin that adds some text at the end of each blog-post and receives the corresponding text via the plugin's configuration.
Now we have to register this plugin in src/main/resources/pebble-plugins.xml
Place this xml-content somewhere where the other content-decorators are located
<content-decorator name="Add Text" class="net.sourceforge.pebble.decorator.AddText">
  <!--optional-->
  <description>
    <![CDATA[
  Add Text at the end of the blog
    ]]>
  </description>
  <!-- describe what fields should be added to the configuration. those are generated on the fly -->
  <config key="addtext.text" name="TEXT" type="string"/>
  <!-- here the other possible types:
  <config key="addtext.checkb" name="Are you sure?" type="checkbox"/>
  <config key="addtext.textarea" name="More Text" type="textarea"/>
  <config key="addtext.password" name="Password" type="password"/>
   -->
</content-decorator>
Important is to add our fully qualified classname here and give the plugin a name.
description and config-tags are optional
Now it's time to test our plugin:
- restart tomcat
- login
- go to the plugins-page. Our plugin be located with the other Content Decorators:
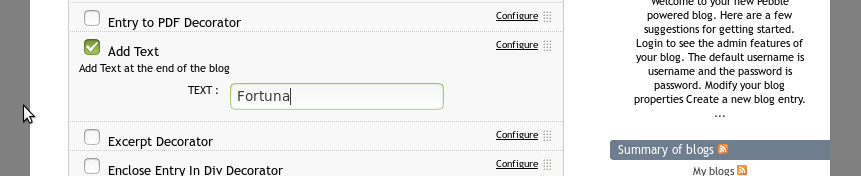
- Click on the plugin's configure-button
- Type in some Text
Scroll down the page and apply the change
For some reason the about page seems to be damaged. This page shows an overview of all plugins. The plugins get applied even though there seems to be something wrong with applying the pluginsGo to a blog post. And see your fancy new plugin doing some hard work :D